Jelly Cookies

The Recipe Repository

Ages: 6-8

Less than 30 minutes

Grownup needed

A white, slightly square-shaped plate holds a small assortment of colorful, round cookies. There are two pale yellow cookies, two light orange/pink cookies, and two pale green cookies. They appear to be small and possibly homemade. The plate sits on a plain off-white surface.

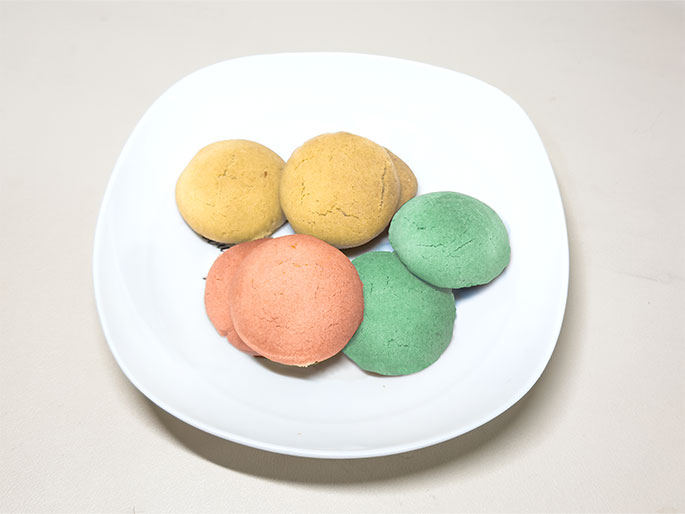
This jelly cookie recipe is both fun and colourful! These little biscuits are not only vibrant and fragrant but also carry the distinctive fruit flavours of jelly. They can be made with just a few simple ingredients. Whether it's family baking time or party treats, they're sure to be the centre of attention!

Materials Needed

  • 1½ cups softened unsalted butter
  • 1 cup caster sugar
  • 1 egg
  • 1 egg
  • 1 teaspoon baking powder
  • ½ teaspoon bicarbonate of soda
  • ¼ teaspoon cream of tartar
  • 1 cup melted jelly, food colouring
  • large bowl, mixing spoon
  • whisk
  • measuring spoons
  • cup
An overhead shot displays an array of baking ingredients and tools arranged on a light wood-grain surface. The items include a large clear glass mixing bowl with a white spatula, a clear glass, a small pale yellow bowl containing flour, a small clear glass bowl with butter, a metal whisk, two small clear glass bowls with white powders (likely baking soda and baking powder), a larger clear glass bowl with flour, a set of black measuring cups and spoons, a small clear measuring cup or beaker with a yellow liquid (possibly oil), a small clear measuring cup with brown sugar, a small clear bowl with a white powder (possibly sugar), and a single egg. The arrangement suggests preparation for baking.

Step-by-step tutorial

Step 1

Preheat the oven to 200°C and place 1½ cups of softened unsalted butter and 1 cup of caster sugar in a large bowl.

A clear glass mixing bowl sits on a light wood-grain surface. Inside the bowl, a small mound of white granulated sugar sits next to a pat of yellow butter. The ingredients appear ready to be creamed together, likely as a first step in a baking recipe.
Step 2

Use a whisk to cream the butter and sugar until light and fluffy, and the butter becomes pale.

A clear glass bowl containing a pale yellow, creamed mixture sits on a light wood-grain table. A metal whisk rests in the mixture, suggesting it was used to combine the ingredients, likely butter and sugar, creating a smooth, creamy base for a baking recipe.
Step 3

Add one egg and one teaspoon of vanilla extract to the bowl and mix well.

A clear glass bowl, containing a creamed mixture of butter and sugar, sits on a light wooden surface. A whole egg and a small amount of vanilla extract, held in a black measuring spoon by a hand, are being added to the mixture. A whisk is also in the bowl, implying the ingredients are about to be combined.
Step 4

In another large container, combine 3¼ cups plain flour, 1 teaspoon baking powder, ½ teaspoon bicarbonate of soda, and ¼ teaspoon cream of tartar. Mix well with a spoon.

A clear glass bowl with a wooden and black handle, resembling a small saucepan, sits on a light wood-grain surface. Inside the bowl is flour, and a hand holds a black measuring spoon containing a small amount of white powder, likely baking powder or baking soda, over the flour. This suggests the dry ingredients are being prepared for a baking recipe.
Step 5

Gradually add the flour mixture to the butter mixture, stirring between additions.

A clear glass mixing bowl sits on a light wood-grain surface. Inside, a pale yellow creamed mixture, likely butter and sugar, has a mound of white flour on top. A white spatula rests in the bowl, indicating the flour is about to be incorporated into the wet ingredients. This image depicts a stage in preparing a batter or dough.
Step 6

Continue mixing until the dough is free of lumps.

A clear glass mixing bowl rests on a light-colored, wood-grained surface. Inside the bowl is a mass of pale yellow dough, gathered together but still showing some folds and creases, indicating it has recently been mixed and is ready for the next stage of preparation, such as chilling or rolling.
Step 7

Divide the dough into four portions and sprinkle two tablespoons of jelly mixture over each portion.

Four clear glass bowls, each containing a portion of pale yellow dough, are arranged in a semi-circle on a light wood-grain surface. A black measuring spoon, filled with a dark liquid, likely a food coloring or flavoring extract, is being poured into one of the bowls of dough. This image suggests the dough is being divided and prepared for individual flavoring or coloring.
Step 8

Add food colouring to the mixed dough to make your cookies more vibrant. Then knead the dough until evenly mixed.

Four clear glass bowls are arranged in a semi-circle on a light wood-grain surface. Each bowl holds a portion of pale yellow dough. A hand wearing a clear plastic glove is adding drops of red food coloring to one of the dough portions. The other three portions remain uncolored, indicating they will likely be colored differently or left plain. This image shows the process of preparing dough for colorful baked goods.
Step 9

Roll the dough into 1-inch balls. If desired, roll the balls in sugar for sweeter cookies.

A small, clear glass bowl, possibly a measuring cup, sits on a light wood-grain surface. Inside, a small ball of pale yellow dough is nestled in a bed of white powdered sugar. This image likely depicts a step in making a type of cookie or confection where the dough is coated in powdered sugar before baking or serving.
Step 10

Place the dough balls on a baking tray, spacing them about two inches apart. Flatten them with a cup so they'll bake evenly.

Three unbaked cookies, each a different color, sit on a baking sheet lined with parchment paper. From left to right, the cookies are light brown, light green, and pale yellow. A clear drinking glass is pressing down on the yellow cookie, flattening it. This image demonstrates the process of shaping cookies before baking.
Step 11

Bake the cookies at 180°C for 10-15 minutes.

Six unbaked cookies, in three different colors, are arranged on a baking sheet lined with parchment paper. The colors are pale yellow, light orange, and light green, with two cookies of each color. They are evenly spaced and lightly dusted with powdered sugar. The image shows the cookies prepared and ready to be baked.
Step 12

Patiently wait for the cookies to finish baking, remove them from the tray, and once cooled, enjoy your delicious jelly cookies!

A white, slightly square plate holds a small assortment of baked cookies. The cookies are in three colors: light orange, pale yellow, and light green. They appear slightly domed and have a smooth, slightly cracked surface. The arrangement suggests a homemade treat.

Top categories

Stem Activities
Art & Crafts
Sensory Play
Cooking
Outdoor Fun
Holiday & Events