Paper Dominoes

Stem Activities

Ages: 6-8

Less than 30 minutes

Grownup needed

Can paper pieces fall like domino tiles? Yes, they can! But first, you'll need to make them stand up! Arrange folded paper pieces at specific intervals, then knock down the first one to watch them roll like waves! This experiment helps you understand 'chain reactions' - just like real domino tiles, where one small action can trigger a series of changes!

Materials Needed

  • Origami paper
  • Marker pens
  • Ruler
A blank pale yellow sticky note, a black fine-tipped marker, and a clear plastic ruler are arranged on a marbled gray surface. The items are laid out separately, suggesting preparation for a task involving measuring and marking, likely note-taking or a crafting project. The overhead view presents the items simply against the textured background.

Step-by-step tutorial

Step 1

Take a piece of origami paper and fold it in half.

A rectangular piece of light teal or aqua-colored material lies flat on a marbled gray surface. The material appears to be paper or thin cardstock and is positioned horizontally. It is unmarked and takes up a small portion of the frame, with the marbled background providing a textured contrast. The image suggests the material is ready for use in a craft or other project.
Step 2

Unfold the paper, then fold both top and bottom sides along the centre crease.

A rectangular piece of light teal paper or cardstock is folded in half horizontally on a marbled gray surface. A dashed black line indicates the original center crease, and red arrows above and below the folded paper demonstrate the folding action towards the center. The image shows the process of folding the paper, likely as part of a craft or origami project.
Step 3

Unfold the bottom of the paper and fold both corners along the crease as shown.

A piece of light teal paper or cardstock is partially folded into the shape of an envelope or pouch on a marbled gray surface. The top flap is folded down, and the bottom corners are folded inwards towards the center, creating triangular flaps. Red arrows indicate the direction of the corner folds. A dashed black line across the bottom section likely represents a previous fold or a guide for a future fold. The image demonstrates a step in a paper folding or origami project.
Step 4

Fold the bottom edge along the crease.

A light teal piece of paper or cardstock is being folded into a pouch or envelope shape on a marbled gray background. The top flap is folded down, and the bottom corners, previously folded inward, are now folded upwards, creating a trapezoidal shape at the bottom. A red arrow in the center indicates the upward folding motion of the bottom section. A dashed black line across this section likely marks a previous fold line or serves as a guide. The image illustrates a step in an origami or paper-folding process.
Step 5

Next, fold the top corners towards the centre line as shown.

A light teal piece of paper is being folded on a marbled gray surface, resembling a flattened, open pouch or envelope. The top corners are folded downwards towards the center, and the bottom section is folded upwards. Red curved arrows on the top corners indicate the downward folding action. A dashed black line horizontally across the center likely indicates a previous fold line or serves as a guide for further folding. The image captures a stage in an origami or paper crafting process.
Step 6

Fold the top edge along the centre line.

A light teal piece of paper or cardstock is folded on a marbled gray surface, resembling a narrow, open container or pouch. Both the top and bottom edges are folded inward and then folded down towards the center, creating small flaps. A red arrow pointing downwards indicates the folding direction of the top flap. Dashed black lines across the top and bottom near the folded edges likely indicate previous fold lines or guides for the current folds. The image shows a step-by-step process of paper folding, likely origami or a similar craft.
Step 7

Finally, as shown, make guide lines at the peaks of the two small triangles and fold the paper accordingly. Repeat this folding process to create 5-7 paper pieces.

A light teal piece of paper, folded into a small, open container or pouch shape, rests on a marbled gray surface. The top and bottom edges are folded inwards and downwards towards the center, creating small flaps. A vertical dashed black line down the center of the paper suggests the next fold line for creating the final shape of the pouch or container. The image illustrates a step in a paper folding activity, likely origami or a similar craft.
Step 8

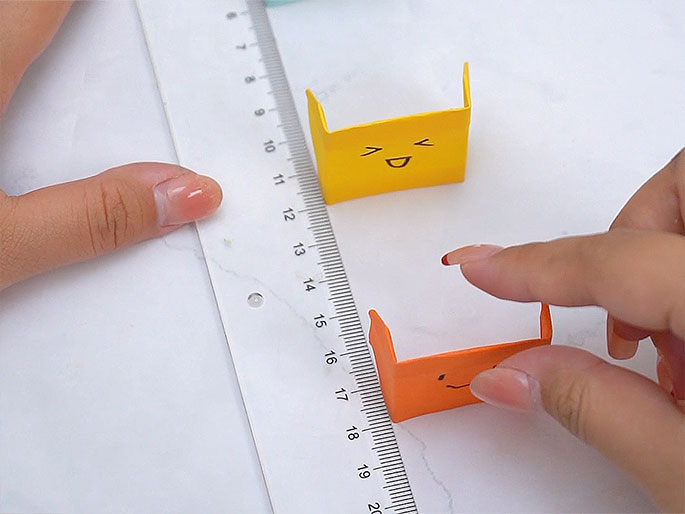
Turn over the folded paper pieces and draw faces on them with markers. Note: place the thicker folded edge facing upwards.

A person's hands are in the process of drawing a simple face onto a folded piece of light pink paper. The paper, possibly origami, resembles a small, flattened pouch. The face consists of two small oval eyes and a smiling mouth being drawn with a black marker. The hand holding the marker is visible in the right side of the frame, while the other hand gently holds the pink paper. A folded piece of light green paper is visible in the top left corner. The background is a marbled gray surface.
Step 9

Arrange the paper pieces with 6cm gaps between each piece. Note: this spacing is crucial for success!

Two small, folded paper figures with drawn-on faces are positioned near a ruler on a white surface. The figure closer to the ruler is yellow with a happy expression, while the second figure, slightly further away and being held by fingers, is orange with a more neutral or slightly unhappy face. A person's hands are visible, one near the ruler and the other interacting with the orange figure. The ruler and the placement of the figures suggest they may be part of a measuring activity or a game involving distance and expressions.
Step 10

Push the first paper piece in line - did your paper dominoes work?

Four small origami boxes, each a different color (light green, orange, yellow, and orange-red), are arranged on a marble-like surface. Each box has a simple, hand-drawn face expressing a different emotion. Blurred in the background are various craft supplies, including a box labeled Water Blaster. The video showcases these small, folded paper creations.

Top categories

Stem Activities
Art & Crafts
Sensory Play
Cooking
Outdoor Fun
Holiday & Events