Anti-Gravity Suspension Frame

Stem Activities

Ages: 6-8

Greater than 30 minutes

Grownup needed

Many buildings and art installations can maintain strange angles without collapsing - some even appear to float in mid-air defying logic. But how is this possible? Create this seemingly magical anti-gravity device using cotton string and lolly sticks to explore the fascinating science behind making objects 'float'.

Materials Needed

  • 8 lolly sticks
  • Paint palette
  • Pencil
  • Paintbrush
  • Ruler
  • Cotton string
  • Paint
  • Glue
  • Craft knife
  • Scissors
An overhead flatlay shot displays an assortment of craft supplies arranged neatly on a light wooden surface. The items include a bundle of wooden craft sticks, a flower-shaped paint palette, a pencil, a paintbrush, a ruler, scissors, a utility knife, a bottle of glue, two small tubes of paint (red and yellow), and a ball of white yarn or string. The arrangement suggests preparation for a craft project.

Step-by-step tutorial

Step 1

Paint the lolly sticks in your favourite colours.

Two hands work on a craft project involving wooden craft sticks on a light wooden surface. One hand holds an orange-painted craft stick, while the other hand uses a paintbrush to apply more orange paint to the end of the stick. In the background, several other craft sticks are visible, painted in shades of yellow, suggesting a gradient effect is being created.
Step 2

Once dry, arrange the lolly sticks according to the numbered sequence shown in the image.

Three yellow craft sticks are arranged on a light wood-grain background to form an equilateral triangle. The sticks are numbered 1, 2, and 3, clockwise from the top left.
Step 3

Using the pencil, draw guide lines where the lolly sticks overlap.

On a light wooden surface, two hands manipulate yellow craft sticks arranged in a triangle. One hand holds the triangle while the other hand uses a pencil to mark lines near the corners of the bottom craft stick, seemingly preparing to cut or modify it.
Step 4

Repeat the same process to mark guide lines on the other three lolly sticks.

Six yellow craft sticks are arranged vertically on a light wooden background. Each stick has a small diagonal line marked near its rounded top end. This suggests they are being prepared for a craft project and will be cut or shaped along these marked lines.
Step 5

Using scissors, cut the lolly sticks along the guide lines.

Two hands are positioned above a light wooden surface working with yellow craft sticks. One hand holds a single craft stick horizontally, while the other hand uses scissors to cut the end of that stick. Several more craft sticks stand vertically in the background.
Step 6

Apply glue to the cut edges and join three sticks to form a triangle as shown. You'll need to make two of these triangles.

Two hands hold a large triangle made of yellow craft sticks against a light wooden background. A smaller, similarly constructed triangle is visible to the left, suggesting a progression in a craft project.
Step 7

Using the craft knife, make small holes at each corner of the glued triangles large enough for the string to pass through.

On a light wood-grain background, two hands are shown constructing a triangle from yellow craft sticks. One hand holds the triangle steady, while the other hand uses a red and black utility knife to score or cut one of the sticks.
Step 8

Take the remaining two lolly sticks and mark them at 10cm and 11cm respectively, then connect these lines as shown.

An orange craft stick is centered on a light wooden background. Lines and measurements are marked on the stick. A diagonal line near the top marks a section 1cm long, while a vertical line alongside the stick indicates a total length of 10cm. This suggests the stick is being measured and marked for cutting as part of a craft project.
Step 9

Cut both lolly sticks along the connected lines.

Two hands are shown cutting an orange craft stick with scissors. The craft stick is held diagonally across the image against a light wooden background, and the scissors are positioned to cut across it.
Step 10

Make a small hole at one end of each uncut lolly stick using the craft knife.

Two hands are working with orange craft sticks on a light wooden surface. One hand holds a stick while the other uses a red and black utility knife to make a precise cut. Another stick, already cut at an angle, lies to the left, indicating steps in a crafting process.
Step 11

Take one of the cut lolly sticks, apply glue to the cut edge, and attach it to the centre of one edge of a triangle.

Against a light wooden background, two hands manipulate a triangle constructed from yellow craft sticks. One hand holds the triangle while the other uses a wooden skewer or toothpick to apply glue or some other substance to one of the sticks. This suggests a stage in a craft project where the pieces are being assembled.
Step 12

Apply glue to the cut edge of the other cut lolly stick and attach it to the centre of one corner of the second triangle as shown. Be careful not to cover the holes in the triangle.

Two hands are assembling a craft project on a light wood background. One hand holds a triangle made of yellow craft sticks, while the other hand positions a smaller, orange craft stick against the base of the triangle. This image appears to capture a moment during the construction of a craft item.
Step 13

Cut three 15cm lengths and one 6cm length of string.

Two hands are shown cutting a length of white string or yarn with scissors against a light wooden background. One hand holds the string taut, while the other hand operates the scissors. The image suggests a simple action of cutting string for a craft or other activity.
Step 14

Once the glue from step 11 is dry, thread and secure the strings through the prepared holes.

A simple craft project is displayed on a light wooden surface. A triangle formed from yellow craft sticks has a smaller orange stick attached to its top point. Pieces of white string are tied to the two lower corners of the yellow triangle, suggesting the next steps in assembling a hanging mobile or similar object.
Step 15

Turn the assembly from step 12 upside down, positioning the corner with the attached stick on the left. Thread the strings through the corresponding holes and secure them, ensuring the middle two sticks align.

A three-dimensional craft object, constructed from yellow and orange craft sticks and white string, sits on a light wooden table. The base is a yellow triangle, and the string extends upwards to form a prism-like shape. Two orange sticks are suspended within the string structure, appearing to swing or hang freely. A white wall forms the backdrop, decorated with simple cutouts of a light blue flower, a red circle, and a pink flower.
Step 16

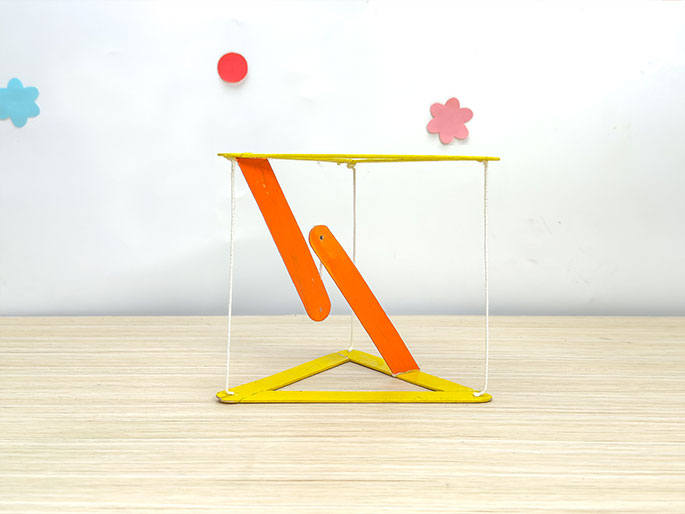
Your anti-gravity suspension frame is now complete. Lift the top stick and watch the magic happen!

A small, kinetic sculpture made of craft sticks and string rests on a light wood table. The sculpture appears to be in motion, or mid-tumble. It's primarily constructed of yellow sticks, with an orange stick suspended within a triangular frame. White string connects various parts of the sculpture. The background is a plain white wall with small, pastel-colored flower and circle shapes.

The Science Behind It:

The anti-gravity suspension frame works by utilising force balance and tension to create a stable structure. When the strings are pulled taut, they create internal tension that counteracts the structure's natural tendency to fall under gravity, resulting in stable equilibrium.

Top categories

Stem Activities
Art & Crafts
Sensory Play
Cooking
Outdoor Fun
Holiday & Events