DIY Respiratory System

Stem Activities

Ages: 6-8

Less than 30 minutes

Grownup needed

Breathing is fundamental to life, and understanding the science behind it enhances our appreciation and respect for our bodies. Create a simple DIY lung model and explore the fascinating process of breathing with your child!

Materials Needed

  • Plastic bottle
  • Tape
  • Modelling clay
  • 3 balloons
  • Scissors
  • 2 thin straws
  • 1 thick straw
  • Ruler
An overhead flatlay on a light woodgrain surface displays various items, likely for a science experiment or craft project. These include an empty clear plastic bottle lying on its side, a roll of clear tape, a small blue package (possibly containing powder or a small object), two deflated balloons (one light pink and one light blue), a pair of white-handled scissors, two straws (one pink and one blue), and a clear plastic ruler. The arrangement suggests preparation for an activity involving these materials.

Step-by-step tutorial

Step 1

Using scissors, cut 8cm sections from each of the three straws.

A pair of hands uses scissors to cut a pink flexible straw against a light woodgrain background. A shorter, already-cut piece of pink and blue straw lies near the top of the frame. This image likely demonstrates a step in a DIY project or science experiment involving the straws.
Step 2

Insert the two thin straw sections into the thick straw.

Two hands hold a blue and pink straw against a light woodgrain background. A shorter section of a pink straw is inserted into the end of the blue straw. This close-up image likely illustrates a step in constructing something using straws, possibly for a craft or science experiment.
Step 3

Secure the connection points between the thin and thick straws using tape.

Two hands hold a blue and pink straw with a piece of clear tape being wrapped around the joint where the two straws meet, against a light woodgrain background. This close-up image likely illustrates a step in a DIY or science project where the straws are being connected securely.
Step 4

Attach balloons to each thin straw and secure them firmly with tape.

Against a light woodgrain background, two hands are shown attaching a deflated pink balloon to a blue straw. The straw, secured with tape at the connection point, is inserted into the neck of the balloon, which is being held and pinched to create a seal. This image likely demonstrates a step in a science experiment or a DIY project involving balloons and straws.
Step 5

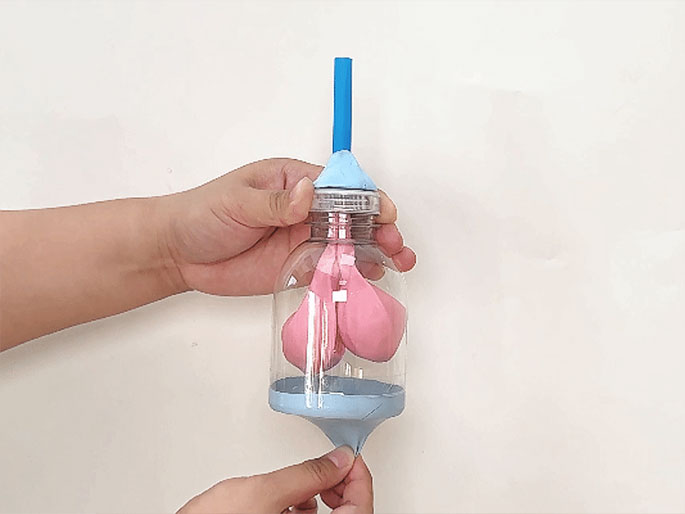
Next, cut off the bottom of the plastic bottle using scissors. Ask an adult for help if you find this step difficult.

Against a light woodgrain background, two hands are shown cutting a clear plastic bottle with a pair of scissors. The bottle has already been partially cut, and the top portion, which includes the bottle's neck and cap, is being trimmed further. This image likely depicts a step in a DIY project or craft activity involving repurposing a plastic bottle.
Step 6

Take one balloon and cut it in half with scissors, keeping the neck end for later use.

Two hands are using scissors to cut the neck off of a light blue balloon. The balloon is deflated and held taut against a light woodgrain background. This image likely demonstrates a step in a craft or DIY project involving balloons.
Step 7

Stretch the cut balloon neck over the bottom of the plastic bottle.

Two hands hold a clear plastic bottle that has a light blue balloon stretched over its opening, creating a seal. The bottle is positioned upright against a light woodgrain background. This image likely shows a stage in a science experiment or DIY project, possibly a homemade air pump or launcher.
Step 8

Secure the balloon to the bottle using tape.

Two hands hold a clear plastic bottle, upside down, with a light blue balloon stretched and secured over the bottom. The balloon is taped around the edges where it meets the plastic. The bottle and balloon are against a light woodgrain background. This appears to be a step in constructing a homemade device, likely for a science project or DIY activity.
Step 9

Using scissors, make a small hole in the centre of the bottle cap that's just large enough for the straw.

Against a light woodgrain background, two hands are shown. One hand holds a white plastic bottle cap, while the other hand uses scissors to make a small cut or hole in the center of the cap. This image likely depicts a step in a DIY project or craft activity involving repurposing a bottle cap.
Step 10

Thread the thick straw up through the hole in the bottle cap from below.

Two hands are shown against a light woodgrain background. One hand holds a blue straw which has a white plastic bottle cap attached to one end. The other hand holds a deflated pink balloon, the neck of which is stretched and taped around the other end of the blue straw. This image likely depicts the construction of a simple balloon-powered projectile launcher or a science experiment demonstrating air pressure.
Step 11

Use modelling clay to seal the connection between the bottle cap and thick straw. Ensure it's completely airtight.

Two hands hold a small device constructed from a plastic bottle cap, a blue straw, and a pink balloon. Light blue putty or clay seals the area where the straw enters the bottle cap. The neck of the deflated pink balloon is attached to the bottom of the bottle cap. The background is a light woodgrain surface. This image likely depicts a homemade toy or a science experiment, possibly a balloon-powered pump or projectile launcher.
Step 12

Secure the prepared cap onto the plastic bottle.

Two hands hold a clear plastic bottle against a light woodgrain background. Inside the bottle is a deflated pink balloon. A blue straw is inserted into the bottle's opening; light blue putty or clay seals the space around the straw. This setup likely demonstrates a science concept related to air pressure or serves as a homemade pump or launcher.
Step 13

Now, pull the balloon at the bottom of the bottle. Observe what happens to the balloons inside the bottle.

Two hands manipulate a homemade device constructed from a clear plastic bottle, two balloons (one pink, one light blue), and a blue straw. The pink balloon is inside the bottle and partially inflated. The light blue balloon is stretched over the bottom opening of the bottle. The blue straw is inserted in the bottle's top opening and sealed with light blue putty or clay. One hand holds the bottle while the other gently pulls on the light blue balloon at the bottom. The background is plain white. This appears to be a science experiment demonstrating lung function or the principles of air pressure and volume.

The Science Behind It:

This simple model helps us understand the basic principles of breathing.

Inhaling: When we pull the balloon simulating the diaphragm, the pressure inside the plastic bottle decreases below atmospheric pressure, causing the balloons (lungs) to expand.

Exhaling: Releasing the diaphragm balloon simulates the relaxation of the diaphragm, reducing the chest cavity volume and causing the balloons (lungs) to contract. During each deep breath, the intricate cooperation between our diaphragm and chest cavity allows air to flow in and out of our lungs, sustaining life.

Top categories

Stem Activities
Art & Crafts
Sensory Play
Cooking
Outdoor Fun
Holiday & Events