Counting Fish Board

Playful Learning

Ages: 3-5

30 minutes

Grownup needed

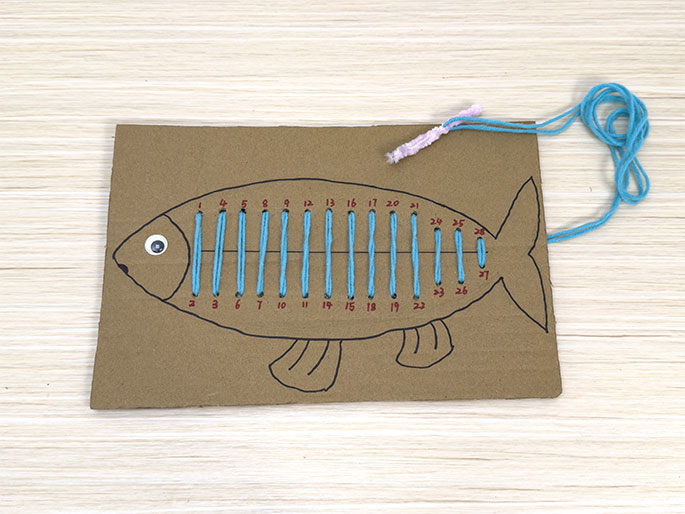
A math game that helps young children recognize numbers and numerical order while developing fine motor skills. You can adjust the numbers on the board based on your child's developmental stage to create an appropriate difficulty level.

Materials Needed

  • 30cm × 50cm cardboard
  • Ruler
  • Markers
  • Pencil
  • Adhesive googly eye
  • Pipe cleaner
  • Yarn
An assortment of craft supplies lies arranged on a light wood-grain table, suggesting preparation for a children's art project. The items include a rectangular piece of brown cardboard, two white dry-erase markers (one with a black cap, the other with a red cap), a blue pencil, a light pink pipe cleaner bent into a curve, a clear plastic ruler, two small white googly eyes with black pupils, and a tangle of teal yarn or string. These materials likely will be used to create a character or decorative item.

Step-by-step tutorial

Step 1

Draw a long fish on the 30cm × 50cm cardboard using a marker.

Two hands are engaged in drawing a fish on a piece of brown cardboard placed on a light wood-grain table. One hand holds the cardboard steady, while the other hand uses a white dry-erase marker to complete the outline of the fish's tail. The fish drawing features a simple, child-like style, with a large eye, a horizontal line dividing the body, small fins along the bottom, and a triangular tail. This image likely depicts a stage in a children's craft activity.
Step 2

Attach a googly eye to the fish's head.

A simple fish drawing, made with black marker, is shown on a piece of brown cardboard resting on a light wood-grain surface. A small, white googly eye with a black pupil has been affixed to the fish's head. The fish is drawn in a child-like style, with a horizontal line across its body, small fins at the bottom, and a triangular tail. This image likely depicts a stage in a children's craft project where a fish is being created from cardboard.
Step 3

Using a ruler and marker, mark dots every 1.5cm along the bottom half of the fish. Then make corresponding marks vertically aligned on the top half of the fish.

Two hands work on a fish-shaped piece of brown cardboard on a light wood-grain table. A row of dots has been drawn along the top and bottom edges of the fish outline. One hand holds a clear plastic ruler against the lower edge of the fish, while the other hand uses a white dry-erase marker to draw a straight line along the ruler. The ruler shows a measurement of approximately 1.5cm marked on the cardboard. A googly eye is already attached to the fish's head. This image seems to capture a step in a craft project, likely involving cutting or folding along the marked lines.
Step 4

Use a pencil to punch small holes at each marked point.

A partially completed craft project featuring a fish drawn on brown cardboard sits on a light wood-grain table. The fish outline, drawn in black marker, has dotted lines along its top and bottom edges, and a solid line dividing its body horizontally. A googly eye is attached to the fish's head. One hand holds the cardboard, while the other hand uses a blue pencil to connect the dots along the fish's outline, likely in preparation for cutting or folding.
Step 5

Write numbers in a snake pattern above or below the dots using a red marker.

A fish shape drawn on brown cardboard is displayed on a light wood-grain table. The fish outline and fins are drawn in black marker. A googly eye is stuck to the fish's head. Small holes have been punched along the top and bottom edges of the fish's body, and red numbers are written next to each hole, sequentially from 1 to 27 along the top and 2 to 26 along the bottom. A horizontal line divides the fish's body. This image likely represents a child's sewing or lacing activity where yarn or string will be threaded through the numbered holes.
Step 6

Fold a pipe cleaner in half and twist the ends together to secure them.

Two hands manipulate a light purple pipe cleaner against a light wood-grain background. The pipe cleaner is folded in half, and the hands are pinching the folded end together, likely as the first step in creating a shape or design with the pipe cleaner.
Step 7

Thread yarn through the pipe cleaner and tie a knot at the end to create your threading tool.

Two hands hold a length of bright teal yarn against a light wood-grain background. A simple overhand knot has been tied in the yarn. A small, folded piece of light purple pipe cleaner is visible at the top left corner, suggesting it might be used later in the project. The image appears to depict a stage in a crafting activity.
Step 8

Start threading through the holes in the fish, beginning with number 1 from the bottom of the cardboard.

Two hands hold a piece of brown cardboard cut into the shape of a fish against a light wood-grain background. The fish has a googly eye, black outlined fins, and numbered holes punched along its top and bottom edges. A piece of light pink pipe cleaner is looped through the first few holes at the top edge. A length of teal yarn is visible at the upper right, likely to be used for lacing through the remaining holes. This image depicts a sewing or lacing activity for children.
Step 9

Can you thread through all the holes in numerical order?

A fish-shaped piece of brown cardboard rests on a light wood-grain table. The fish has a googly eye and black outlined fins. Numbered holes are punched around the fish's outline, and teal yarn has been laced through most of the holes, creating vertical stitches across the body. A small section at the top right, and the bottom edge remain unlaced. A light purple pipe cleaner is tied to the end of the yarn at the top. This image depicts a partially completed children's sewing or lacing activity.

Top categories

Stem Activities
Art & Crafts
Sensory Play
Cooking
Outdoor Fun
Holiday & Events