Fluffy 3D Snowman

Artistic Adventures

Ages: 3-5

30 minutes

Grownup needed

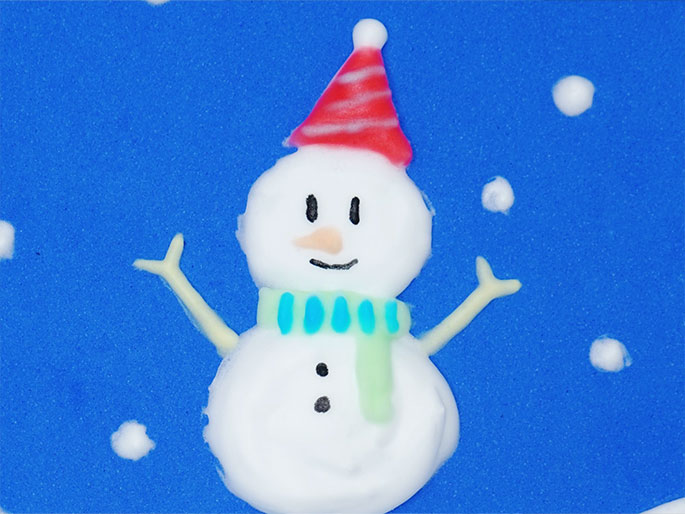
Bring winter magic to life with homemade 3D paint and create a wonderful 3D snowman! This is a delightfully engaging sensory art activity for young children. Once dried, the snowman feels incredibly soft and fluffy, and your child won't be able to resist squishing it over and over again.

Materials Needed

  • Shaving foam
  • White PVA glue
  • Four glass bowls
  • One large glass bowl
  • Food colouring
  • Measuring spoons
  • Card paper
  • Ice lolly sticks
  • Paintbrush
  • Spoon
An overhead flatlay image displays an assortment of craft supplies arranged on a light wood-grain table. The items include a green aerosol can, a white squeeze bottle, a stack of small clear glass bowls, a larger clear glass bowl, four small bottles of colorful liquid (red, blue, green, and yellow), a small black measuring cup, a rectangular piece of bright blue paper, a wooden craft stick, a thin paintbrush, and a white spoon. These items appear to be gathered for a specific craft or science activity.

Step-by-step tutorial

Step 1

Add three cups of shaving foam to the large bowl.

A clear glass bowl containing a thick, white, creamy substance sits on a light wood-grain surface. A hand holding a small, light-colored stick or spatula is actively stirring the mixture. This image likely depicts a step in a recipe or craft project involving mixing ingredients.
Step 2

Add two cups of PVA glue and mix thoroughly with the spoon.

A white, viscous liquid is being poured from a black measuring cup into a clear glass bowl containing a thick, white, creamy substance. A light-colored mixing stick is partially visible in the bowl, resting on the surface of the creamy mixture. The scene is set against a light wood-grain background and suggests a step in a recipe or craft project where ingredients are being combined.
Step 3

Divide the mixture between the four small bowls, then add different food colourings to each bowl and mix well.

Two clear glass bowls containing a white, fluffy substance sit on a light wood-grain surface. In the left bowl, a few drops of green coloring have been added. In the right bowl, a hand is squeezing a small blue bottle, adding blue coloring to the white substance. This image likely depicts a step in a craft or cooking activity where color is being added to a mixture.
Step 4

Using the paintbrush, take some of the shaving foam mixture and paint your snowman on the card paper. Make sure to apply the mixture thickly./p> Several dollops of a thick, white, creamy substance are arranged on a bright blue surface. A metal tool, possibly tweezers or tongs, is lifting a portion of the cream, creating a swirl. The scene suggests a crafting or cooking activity.

Step 5

Wait patiently for 24 hours to allow the snowman to dry.

A cheerful snowman crafted from a white, fluffy material is depicted against a bright blue background. The snowman wears a red and white striped conical hat and a light green scarf with blue dashed lines, suggesting a knitted pattern. Small, white dots scattered around the snowman represent falling snow. The snowman has simple facial features drawn on, including eyes, a carrot nose, and a smiling mouth, and small, light-colored stick arms raised in a welcoming gesture. This image likely represents a winter-themed craft project.
Step 6

Once the snowman is dry, try pressing it with your fingers. How does it feel?

A cheerful snowman crafted from white foam stands out against a vibrant blue backdrop. Sporting a red and white striped party hat and a green striped scarf, the snowman has yellow foam arms raised in a welcoming gesture. Small white foam circles scattered around mimic falling snowflakes, adding to the wintry scene.

Top categories

Stem Activities
Art & Crafts
Sensory Play
Cooking
Outdoor Fun
Holiday & Events