Christmas Tree Bookmark

Artistic Adventures

Ages: 6-8

Less than 30 minutes

Grownup needed

A light blue piece of paper or card stock rests on a dark green fabric printed with Christmas motifs like presents, trees, and snowflakes. Attached to the corner of the blue paper is a small, folded paper Christmas tree. The tree is pale yellow-green with small red and yellow dots and a small gold star at the top. A small rectangular piece of orange paper acts as the tree's trunk. The image shows a festive, handmade Christmas tree corner bookmark.

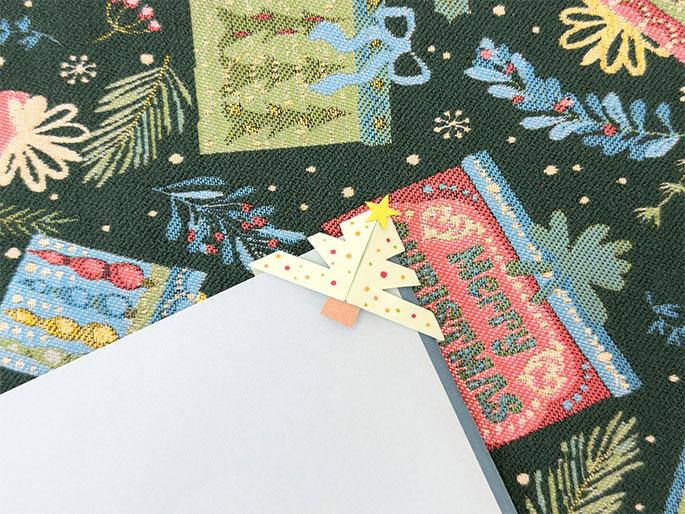
Create your own Christmas-themed bookmark using simple materials like coloured paper, scissors, and glue to add a festive touch to your reading time!

Materials Needed

  • Double-sided tape
  • green
  • yellow and brown square paper (9x9cm or 15x15cm)
  • pencil
  • marker pens
  • scissors
  • ruler
An assortment of craft supplies is arranged on a light woodgrain table or desk. From left to right: a roll of clear tape, three small, stacked squares of paper (brown, yellow, and light green), a gray pencil, two white markers with red and yellow caps, a pair of black scissors, and a clear plastic ruler. The image shows the materials needed for a craft project.

Step-by-step tutorial

Step 1

Fold the green paper to create two diagonal lines.

Two hands fold a piece of light green paper into a triangle shape on a light woodgrain surface. The fingers hold the paper as it's being creased. The image demonstrates a step in a paper folding or origami process.
Step 2

Fold one corner towards the centre point.

Two hands fold a light green piece of paper into a smaller triangle shape on a light woodgrain surface. The paper has been folded in half to create a triangle, and now the outer corners are being folded in to meet at the center crease, creating a narrower, kite-like shape. The image shows a step in a paper folding or origami process.
Step 3

Next, fold the paper along the diagonal line again.

Two hands hold a light green piece of paper folded into a triangular shape with a rectangular base on a light woodgrain surface. The paper has been folded several times to create this shape, which resembles a simple house or a tree. The image shows a step in a paper folding or origami process.
Step 4

Fold the bottom two corners along the middle line as shown.

Two hands are folding a piece of light green paper on a light woodgrain surface. The paper is already folded into a triangular shape, and one of the outer flaps is being folded inwards towards the center crease. This action is creating a smaller, layered triangular form. The image shows a step in a paper folding or origami process.
Step 5

Fold the two corners inward along the centre line and tuck them into the paper as shown.

Two hands manipulate a small, folded piece of light green paper against a light woodgrain background. The paper is folded into a compact, layered shape, resembling a small, flattened diamond or square. The fingers pinch and adjust the folds. This image captures a stage in a paper folding or origami process.
Step 6

Place the multiply-folded triangle part facing upward and use a pencil to draw four acute angles as shown.

A light green piece of folded paper sits on a light woodgrain surface. The paper is folded into a diamond shape, and the upper flaps have small, symmetrical black lines drawn on them, creating a decorative pattern. The image showcases a stage in an origami or paper folding activity.
Step 7

Carefully cut along the guide lines to remove the acute angles.

A pair of scissors with black handles cuts into a folded piece of light green paper held by two hands against a light woodgrain background. The paper is folded into a complex shape with several triangular sections, and the scissors are making a cut into one of these sections. This image illustrates a step in a crafting or origami project.
Step 8

Cut a 3cm x 1.5cm rectangular strip from the brown paper.

A small square of brown paper rests on a light woodgrain surface. The square measures 3cm x 1.5cm, as indicated by black lines and text labels along two of its sides. The image likely depicts a piece of paper being prepared for a craft or origami project.
Step 9

Cut out a yellow star from the yellow paper.

A small, bright yellow star shape is centered on a light woodgrain background. The star appears to be made of paper or a similar material. The simplicity of the image suggests it may represent a single element in a larger craft or decorative project.
Step 10

Attach the yellow star and brown rectangle to the Christmas tree bookmark as shown.

Two hands hold a small, light green origami Christmas tree against a light woodgrain background. The tree is decorated with a small, yellow star at the top and a small, brown square attached to the trunk area. The hands are carefully positioning or adjusting the tree.
Step 11

Use different coloured markers to draw small dots on the Christmas tree bookmark.

Two hands are shown against a light woodgrain background, working on a light green origami Christmas tree. One hand holds the tree, which is decorated with a yellow star, a brown trunk, and colorful dots. The other hand holds a white marker and is adding more orange dots to the tree's branches. The image captures the process of decorating a handmade Christmas ornament.
Step 12

Your personalised Christmas tree bookmark is now complete!

A light-colored piece of paper, likely a page in a book, has a corner folded over. Attached to this folded corner is a small, decorated origami Christmas tree. The tree is light green with colorful dots, a yellow star on top, and a brown trunk. The background is a dark green fabric with a Christmas-themed pattern featuring gifts, trees, and the words Merry Christmas. The image showcases a festive, handmade Christmas bookmark.

Top categories

Stem Activities
Art & Crafts
Sensory Play
Cooking
Outdoor Fun
Holiday & Events